Spring Boot 2 单元测试示例
依赖
1
2
3
4
5
| <dependency>
<groupId>org.springframework.boot</groupId>
<artifactId>spring-boot-starter-test</artifactId>
<scope>test</scope>
</dependency>
|
一、测试 Web 服务
1、新建控制器类 HelloController.java
1
2
3
4
5
6
7
8
9
10
11
12
13
14
15
16
17
| package com.example.demo.controller;
import org.springframework.web.bind.annotation.RequestMapping;
import org.springframework.web.bind.annotation.RestController;
@RestController
public class HelloController {
@RequestMapping("/")
public String index() {
return "index";
}
@RequestMapping("/hello")
public String hello() {
return "hello";
}
}
|
2、新建测试类 HelloControllerTest.java
下面 WebEnvironment.RANDOM_PORT 会启动一个真实的 Web 容器,RANDOM_PORT 表示随机端口,如果想使用固定端口,可配置为
WebEnvironment.DEFINED_PORT,该属性会读取项目配置文件(如 application.properties)中的端口(server.port)。
如果没有配置,默认使用 8080 端口。
1
2
3
4
5
6
7
8
9
10
11
12
13
14
15
16
17
18
19
20
21
22
23
24
25
26
27
28
29
| package com.example.demo.controller;
import org.junit.Assert;
import org.junit.Test;
import org.junit.runner.RunWith;
import org.springframework.beans.factory.annotation.Autowired;
import org.springframework.boot.test.context.SpringBootTest;
import org.springframework.boot.test.web.client.TestRestTemplate;
import org.springframework.test.context.junit4.SpringRunner;
@RunWith(SpringRunner.class)
@SpringBootTest(webEnvironment = SpringBootTest.WebEnvironment.RANDOM_PORT)
public class HelloControllerTest {
@Autowired
private TestRestTemplate restTemplate;
@Test
public void testIndex(){
String result = restTemplate.getForObject("/",String.class);
Assert.assertEquals("index", result);
}
@Test
public void testHello(){
String result = restTemplate.getForObject("/",String.class);
Assert.assertEquals("Hello world", result);
}
}
|
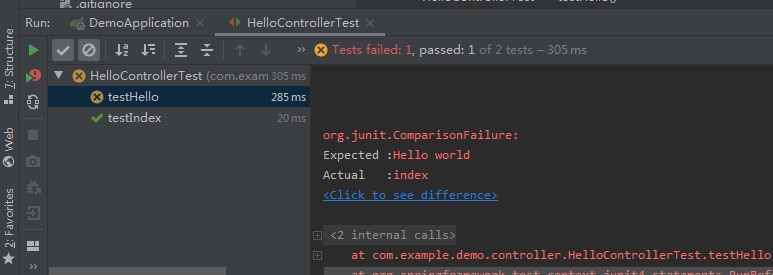
在 HelloControllerTest.java 代码中右键空白行可选择 Run ‘HelloControllerTest’,测试类里面所有方法。
(如果只想测试一个方法如 testIndex(),可在 testIndex()代码上右键选择 Run ‘testIndex()’)
运行结果如下,一个通过,一个失败。
二、模拟 Web 测试
新建测试类 HelloControllerMockTest.java
设置 WebEnvironment 属性为 WebEnvironment.MOCK,启动一个模拟的 Web 容器。
测试方法中使用 Spring 的 MockMvc 进行模拟测试。
1
2
3
4
5
6
7
8
9
10
11
12
13
14
15
16
17
18
19
20
21
22
23
24
25
26
27
28
29
30
31
32
33
34
35
36
| package com.example.demo.controller;
import org.junit.Test;
import org.junit.runner.RunWith;
import org.springframework.beans.factory.annotation.Autowired;
import org.springframework.boot.test.autoconfigure.web.servlet.AutoConfigureMockMvc;
import org.springframework.boot.test.context.SpringBootTest;
import org.springframework.test.context.junit4.SpringRunner;
import org.springframework.test.web.servlet.MockMvc;
import org.springframework.test.web.servlet.MvcResult;
import org.springframework.test.web.servlet.ResultActions;
import org.springframework.test.web.servlet.request.MockMvcRequestBuilders;
import java.net.URI;
@RunWith(SpringRunner.class)
@SpringBootTest(webEnvironment = SpringBootTest.WebEnvironment.MOCK)
@AutoConfigureMockMvc
public class HelloControllerMockTest {
@Autowired
private MockMvc mvc;
@Test
public void testIndex() throws Exception{
ResultActions ra = mvc.perform(MockMvcRequestBuilders.get(new URI("/")));
MvcResult result = ra.andReturn();
System.out.println(result.getResponse().getContentAsString());
}
@Test
public void testHello() throws Exception{
ResultActions ra = mvc.perform(MockMvcRequestBuilders.get(new URI("/hello")));
MvcResult result = ra.andReturn();
System.out.println(result.getResponse().getContentAsString());
}
}
|
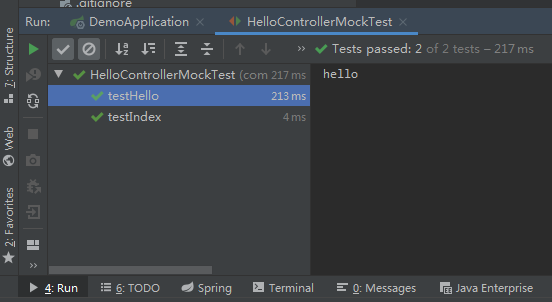
右键 Run ‘HelloControllerMockTest’,运行结果如下:
三、测试业务组件
1、新建服务类 HelloService.java
1
2
3
4
5
6
7
8
9
10
| package com.example.demo.service;
import org.springframework.stereotype.Service;
@Service
public class HelloService {
public String hello(){
return "hello";
}
}
|
2、新建测试类 HelloServiceTest.java
1
2
3
4
5
6
7
8
9
10
11
12
13
14
15
16
17
18
19
20
| package com.example.demo.service;
import org.junit.Test;
import org.junit.runner.RunWith;
import org.springframework.beans.factory.annotation.Autowired;
import org.springframework.boot.test.context.SpringBootTest;
import org.springframework.test.context.junit4.SpringRunner;
@RunWith(SpringRunner.class)
@SpringBootTest(webEnvironment = SpringBootTest.WebEnvironment.NONE)
public class HelloServiceTest {
@Autowired
private HelloService helloService;
@Test
public void testHello(){
String result = helloService.hello();
System.out.println(result);
}
}
|
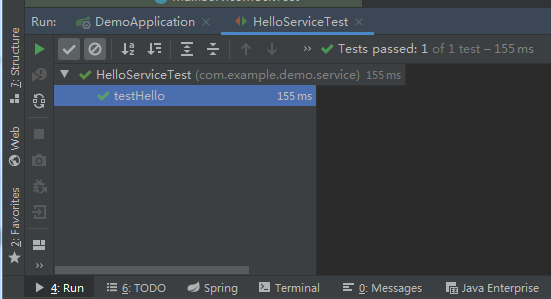
右键 Run ‘HelloServiceTest’,运行结果如下:
四、模拟业务组件
假设上面的HelloService.java是操作数据库或调用第三方接口,为了不让这些外部不稳定因素影响单元测试的运行结果,可使用 mock 来模拟某些组件的返回结果。
1、新建一个服务类 MainService.java
里面的 main 方法会调用 HelloService 的方法
1
2
3
4
5
6
7
8
9
10
11
12
13
14
15
16
| package com.example.demo.service;
import org.springframework.beans.factory.annotation.Autowired;
import org.springframework.stereotype.Service;
@Service
public class MainService {
@Autowired
private HelloService helloService;
public void main(){
System.out.println("调用业务方法");
String result = helloService.hello();
System.out.println("返回结果:" + result);
}
}
|
2、新建测试类 MainServiceMockTest.java
下面代码中,使用 MockBean 修饰需要模拟的组件 helloService,测试方法中使用 Mockito 的 API 模拟 helloService 的 hello 方法返回。
1
2
3
4
5
6
7
8
9
10
11
12
13
14
15
16
17
18
19
20
21
22
23
24
| package com.example.demo.service;
import org.junit.Test;
import org.junit.runner.RunWith;
import org.mockito.BDDMockito;
import org.springframework.beans.factory.annotation.Autowired;
import org.springframework.boot.test.context.SpringBootTest;
import org.springframework.boot.test.mock.mockito.MockBean;
import org.springframework.test.context.junit4.SpringRunner;
@RunWith(SpringRunner.class)
@SpringBootTest
public class MainServiceMockTest {
@MockBean
private HelloService helloService;
@Autowired
private MainService mainService;
@Test
public void testMain(){
BDDMockito.given(this.helloService.hello()).willReturn("hello world");
mainService.main();
}
}
|
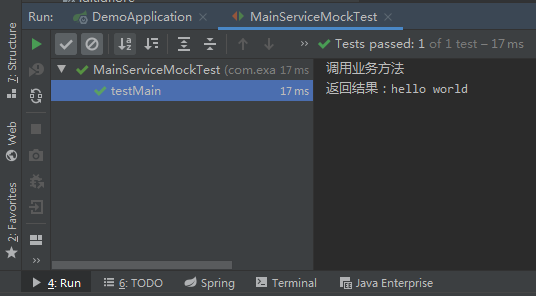
右键 Run ‘MainServiceMockTest’,运行结果如下:
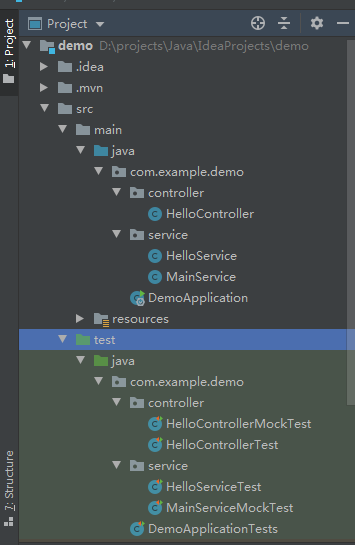
五、IDEA 项目结构图
作者:gdjlc
链接:https://www.cnblogs.com/gdjlc/p/11553274.html
来源:cnblogs
著作权归作者所有。商业转载请联系作者获得授权,非商业转载请注明出处。